React Build Routing with Fixed Header and Navigation | React Router Tutorial
React Build Routing with Fixed Header
To Implement Routing in React, we have required two major libraries
    "react-router": "^5.2.0",
    "react-router-dom": "^5.2.0",
You can find the official document of React Router here.
https://reactrouter.com/web/guides/quick-start
💡 Imports which are required:
import {
  BrowserRouter as Router,
  Switch,
  Route,
  Link
} from "react-router-dom";
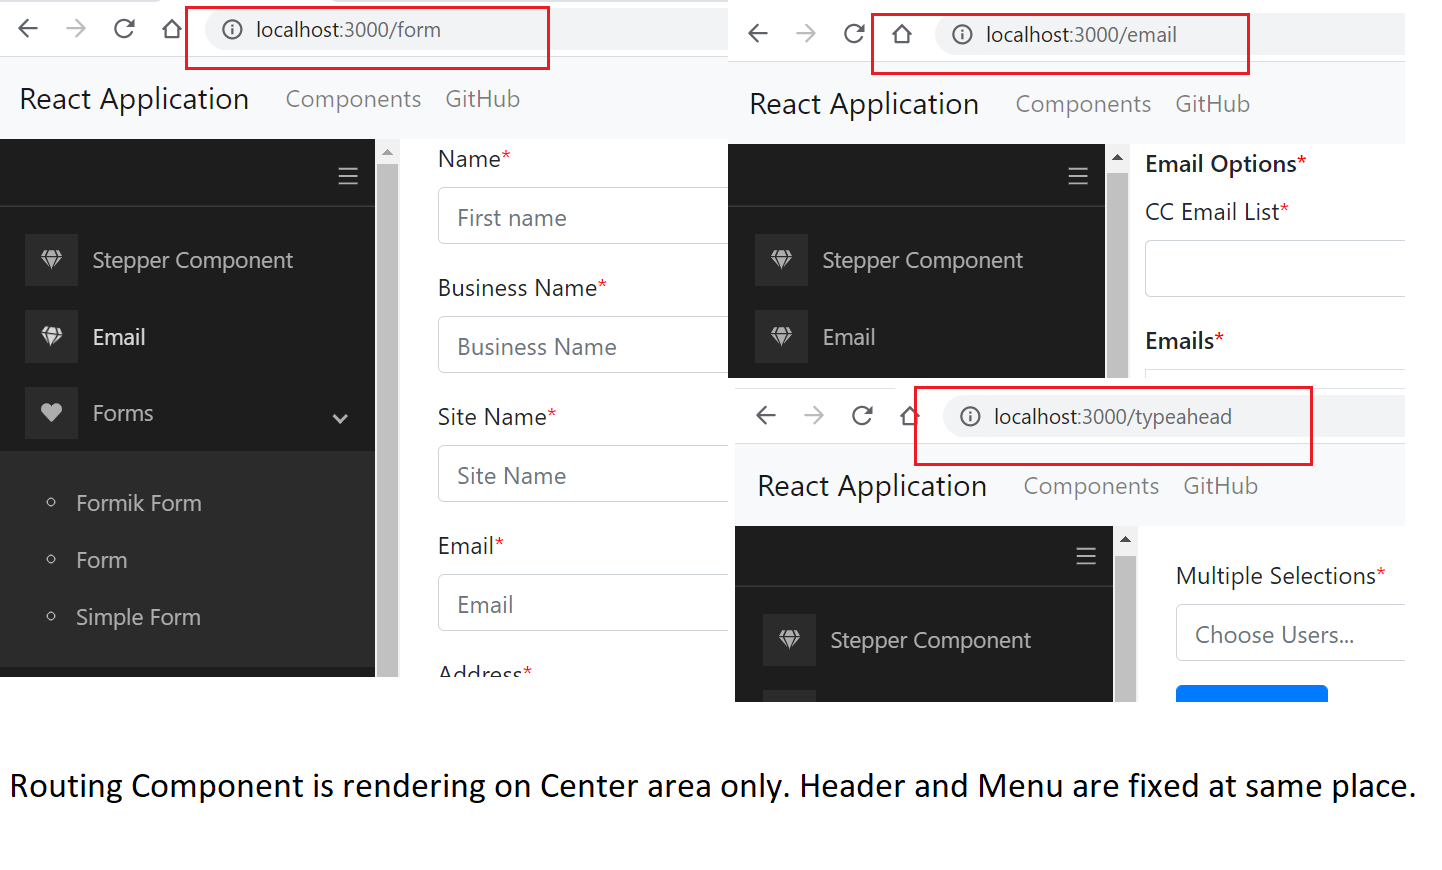
In this article, I will show you how to implement React Routing functionality. In Single page application, Routing is the most important feature to move from one component to other.
Most of the articles teach you to add routing only but here we have a requirement to route or navigate from one page to another page, our Side Menu and Header should be fixed. It needs to only update the Content area.
In this post, I am not going to focus on creating header or side menus, You can go to my other article to catch this.
https://www.jsmount.com/react-create-dashboard-layout-with-side-menu-header-content-area/
📁 index.js
ReactDOM.render(
  <React.Fragment>
    <App />
  </React.Fragment>,
  document.getElementById("root")
);
📁 App.js
import Routing from "./components/Routing";

function App() {
  return <Routing></Routing>;
}

export default App;
📁 Routing.js
import React from "react";
import { BrowserRouter as Router } from "react-router-dom";
import { Col, Row } from "reactstrap";

import RoutingPath from "./RoutingPath";

// These below component , I have created in my other React article, you can find from there.
import Header from "./template/Header";
import SideNavigation from "./template/SideNavigation";

const Routing = () => {
  const styles = {
    contentDiv: {
      display: "flex",
    },
    contentMargin: {
      marginLeft: "10px",
      width: "100%",
    },
  };

  // We have designed this Component with Row, Col Layout and placed Header,
  // Side Menu and Routing as per our requirement.
  return (
    <Router>
      <Row>
        <Col>
          <Header></Header>
        </Col>
      </Row>

      <div style={styles.contentDiv}>
        <SideNavigation></SideNavigation>

        {/* Below section is important : we have added our RoutingPath Component here, so all our route will be injected in this same div on DOM */}
        <div style={styles.contentMargin}>
          <RoutingPath></RoutingPath>
        </div>
      </div>
    </Router>
  );
};

export default Routing;
📁 RoutingPath.js
import { Route, Switch } from "react-router-dom";
import AddProspectForm from "./AddProspectForm";
import AsyncAutoComplete from "./AsyncAutoComplete";
import AutoComplete from "./AutoComplete";
import EmailOptions from "./EmailOptions";
import FormikFormComponent from "./FormikForm";
import RouterComponentA from "./routing-test/RouterComponentA";
import Basic from "./SampleForm";
import StepperComponent from "./StepperComponent";

// above we have imported Components, you have to import own component of application.

const RoutingPath = () => {
  return (
    <Switch>
      <Route exact path="/" component={StepperComponent} />
      <Route path="/typeahead" component={AutoComplete}></Route>
      <Route path="/email" component={EmailOptions}></Route>
      <Route path="/asynctypeahead" component={AsyncAutoComplete}></Route>
      <Route path="/formikform" component={FormikFormComponent} />
      <Route path="/form" component={AddProspectForm} />
      <Route path="/basic" component={Basic} />
      <Route path="/routerA/:id/:name" component={RouterComponentA} />
    </Switch>
  );
};

export default RoutingPath;
💡 Now we have to set our Links to navigate.
Links are important to navigate between pages. If we use the HTML anchor element, it will cause us to reload the complete web page. So to overcome this issue React Router provides a Link component to prevent that from reloading the full page.
📁 SideNavigation.js
import { useState } from "react";
import { AiOutlineMenu } from "react-icons/ai";
import { FaGem, FaHeart } from "react-icons/fa";
import {
  Menu,
  MenuItem,
  ProSidebar,
  SidebarHeader,
  SubMenu,
} from "react-pro-sidebar";
import "react-pro-sidebar/dist/css/styles.css";
import { Link } from "react-router-dom";

const SideNavigation = () => {
  const [collapsed, setCollapsed] = useState(false);

  const styles = {
    sideBarHeight: {
      height: "100vh",
    },
    menuIcon: {
      float: "right",
      margin: "10px",
    },
  };
  const onClickMenuIcon = () => {
    setCollapsed(!collapsed);
  };
  return (
    <ProSidebar style={styles.sideBarHeight} collapsed={collapsed}>
      <SidebarHeader>
        <div style={styles.menuIcon} onClick={onClickMenuIcon}>
          <AiOutlineMenu />
        </div>
      </SidebarHeader>
      <Menu iconShape="square">
        <MenuItem icon={<FaGem />}>
          {" "}
          <Link to="/">Stepper Component</Link>
        </MenuItem>
        <MenuItem icon={<FaGem />}>
          <Link to="/email">Email</Link>
        </MenuItem>
        <SubMenu title="Forms" icon={<FaHeart />}>
          <MenuItem>
            <Link to="/formikform">Formik Form</Link>
          </MenuItem>
          <MenuItem>
            <Link to="/form">Form</Link>
          </MenuItem>
          <MenuItem>
            <Link to="/basic">Simple Form</Link>
          </MenuItem>
        </SubMenu>
        <SubMenu title="AutoComplete" icon={<FaHeart />}>
          <MenuItem>
            <Link to="/typeahead">Typeahead</Link>
          </MenuItem>
          <MenuItem>
            <Link to="/asynctypeahead">Async Typeahead</Link>
          </MenuItem>
        </SubMenu>
        <SubMenu title="Router" icon={<FaHeart />}>
          <MenuItem>
            <Link to="/routerA/22/react">Router A</Link>
          </MenuItem>
        </SubMenu>
      </Menu>
    </ProSidebar>
  );
};

export default SideNavigation;
💡 How to Navigate Route by Button Click
💻 Step 1: with useEffect hook and props.history
import React, { useEffect } from "react";
import { Button } from "reactstrap";

const RouterComponentA = (props) => {
  useEffect(() => {
    const params = props.match;
    console.table(params);
  }, [props.match]);

// Router Navigation is done using props.history
  const onClick = () => {
    props.history.push("/routerB");
  };

  return (
    <>
      <h1>Welcome to Router Component A</h1>
      <Button onClick={onClick}>Route to B</Button>
    </>
  );
};

export default RouterComponentA;
💻 Step 2: using useHistory hook
import { useHistory } from "react-router-dom";
import { Button } from "reactstrap";

const RouterComponentB = () => {
  /**
   * Router Navigation is done using useHistory hook
   */

  const history = useHistory();
  const onClick = () => {
    history.push("/routerA");
  };
  return (
    <>
      <h1>This is Router Component B</h1>
      <Button onClick={onClick}>Route to A</Button>
    </>
  );
};

export default RouterComponentB;
💡 How to pass request params with Router
First add parameters with our Route path
<Route path="/routerA/:id/:name" component={RouterComponentA} />
And when clicking on button, we have to do like below.
history.push("/routerA/1/jsmount");
Get these passed params in Component by props.match
 useEffect(() => {
        const params = props.match;
        console.table(params);

    }, [props.match]);
*************
Find Code on Github.
https://github.com/msaxena25/react-examples/tree/develop
💡 ANGULAR ARTICLES
✔ Web Application Security Best Practices | Top Tips to Secure Angular App
✔ What’s new in Angular 9 | Top updates in Angular 9 By JS mount
✔ What’s new in Angular 8 | Angular 8 Latest Feature By JS mount
✔ Best Practices for Writing Angular Apps | Angular Guidelines
✔ NgRx Top Interview Questions and Answers You should know
✔ Tips to Boost Angular App Performance | Web page Speed Optimization
✔ Angular NgModule, AOT, and DI, and EntryComponents with example
✔ Angular Dependency Injection Provider and Types of Provider
✔ Rx JS Top Operators with examples | Rx JS interview questions
✔ Prime NG Row Group with Subheader and Totals Row
✔ How to implement Reactive Form with Prime NG table
✔ Angular Auto Tab Directive : Auto focus on next field
✔ Dynamic Tooltip with Angular Pipe: Performance Orientation
✔ Angular Create a Custom directive to match password and confirm password
💡 ANGULAR INTERVIEW QUESTIONS
✔ Angular Interview Question & Answers for Experienced – Part 1
💡 ANGULAR UNIT TESTING
✔ Angular Unit Testing Spy, Router, Fake Async, tick, & Subscribe
✔ Angular HTTP Request Testing with HttpClientTestingModule & HttpTestingController
💡 TOOLS
✔ VS Code Useful Extensions for Web Development
React Build Routing with Fixed Header
One thought on “React Build Routing with Fixed Header and Navigation | React Router Tutorial”