React JS Stripe Payment Gateway Integration with Node | Step by Step Guide

React JS Stripe Payment
Step 1:
You need to create your account on stripe using your Email Id.
Step 2:
Activate your account by verifying your email address. You will get a verification link on your email account. Simply click here to activate your Stripe account.
Step 3:
Get API Key from Dashboard (For Development Purpose we use Test API Key)
https://dashboard.stripe.com/test/dashboard
💡 There are two types of API keys: publishable and secret.
Publishable API keys are meant solely to identify your account with Stripe, they aren’t secret. In other words, they can safely be published in places like your Stripe.js JavaScript code, or in an Android or iPhone app.Secret API keys should be kept confidential and only stored on your own servers. Your account’s secret API key can perform any API request to Stripe without restriction.
Step 4:
💻 Let’s Create React Component
StripeCheckoutComponent
import { loadStripe } from "@stripe/stripe-js";
import React from "react";

// Make sure to call `loadStripe` outside of a component’s render to avoid
// recreating the `Stripe` object on every render.
const stripePromise = loadStripe("pk_test_public_key");

function StripeCheckoutComponent() {
  const handleClick = async () => {
    // Get Stripe.js instance
    const stripe = await stripePromise;

    // Call your backend to create the Checkout Session
    const response = await fetch(
      "http://localhost:4000/create-checkout-session",
      {
        method: "POST",
      }
    );

    const session = await response.json();

    // When the customer clicks on the button, redirect them to Checkout.
    const result = await stripe.redirectToCheckout({
      sessionId: session.id,
    });

    if (result.error) {
      // If `redirectToCheckout` fails due to a browser or network
      // error, display the localized error message to your customer
      // using `result.error.message`.
    }
  };

  return (
    <div style={{ margin: "5%" }}>
      <img
        style={{ width: "20%", border: "1px gray solid" }}
        src="/images/tshirt.png"
      ></img>
      <h4>You have selected T-shirt</h4>
      <h4>Amount: 200 (INR)</h4>
      <p>Once click on pay, you will be redirected to our Payment gateway.</p>
      <button role="link" onClick={handleClick}>
        {" "}
        Click here to Pay
      </button>
    </div>
  );
}

export default StripeCheckoutComponent;
✔ Note:
🟠 Paste your public key into loadStripe method as given below –
const stripePromise = loadStripe("pk_test_your_API_key");
🟠 Below is our Node Js Application URL that is running on localhost:4000.
We will create a Node JS application for Stripe in the same post.
const response = await fetch(
      "http://localhost:4000/create-checkout-session",
      {
        method: "POST",
      }
    );
Step 5:
In the Above HTML Code, We have used an image named tshirt.png, So put an image inside the public/images folder.
Step 6:
💡 Let’s set up on backend code in Node JS.
To set up the backend server we need a package named express. So first install the express package in our Node JS application folder.
npm install express
Step 7:
Create index.js file in the node application folder.
index.js
const express = require("express");
const app = express();
const secretKey = "sk_test_secret_api_key";
console.log(secretKey);
const stripe = require("stripe")(secretKey);

// Add headers
app.use(function (req, res, next) {
  // Website you wish to allow to connect
  res.setHeader("Access-Control-Allow-Origin", "*");

  // Request methods you wish to allow
  res.setHeader(
    "Access-Control-Allow-Methods",
    "GET, POST, OPTIONS, PUT, PATCH, DELETE"
  );

  // Request headers you wish to allow
  res.setHeader(
    "Access-Control-Allow-Headers",
    "X-Requested-With,content-type"
  );

  // Set to true if you need the website to include cookies in the requests sent
  // to the API (e.g. in case you use sessions)
  res.setHeader("Access-Control-Allow-Credentials", true);

  // Pass to next layer of middleware
  next();
});

app.get("/", async (req, res) => {
  res.json("Hello this is stripe setup server.");
});

app.post("/create-checkout-session", async (req, res) => {
  const session = await stripe.checkout.sessions.create({
    payment_method_types: ["card"],
    line_items: [
      {
        price_data: {
          currency: "inr",
          product_data: {
            name: "T-shirt",
          },
          unit_amount: 40000,
        },
        quantity: 1,
      },
    ],
    mode: "payment",
    success_url: "http://localhost:3000/stripepaymentsuccess",
    cancel_url: "http://localhost:3000/stripepaymentcancel",
  });

  res.json({ id: session.id });
});

app.listen(4000, () => console.log(`Listening on port ${4000}!`));
✔ Note:
🟠 Paste your security key as below in the above code.
const secretKey = "sk_test_secret_api_key";
🟠 Main Post request is “/create-checkout-session”‘ which we have used in our main react js component.
app.post("/create-checkout-session", async (req, res) => {
  const session = await stripe.checkout.sessions.create({
    payment_method_types: ["card"],
    line_items: [
      {
        price_data: {
          currency: "inr",
          product_data: {
            name: "T-shirt",
          },
          unit_amount: 40000,
        },
        quantity: 1,
      },
    ],
    mode: "payment",
    success_url: "http://localhost:3000/stripepaymentsuccess",
    cancel_url: "http://localhost:3000/stripepaymentcancel",
  });

  res.json({ id: session.id });
});
Step 8:
In the above code, we can see two URLs success_url and cancel_url.
So we have to create two pages that will be rendered based on success or cancel the request.
Step 9:
💡 Let’s Create Two React Component StripePaymentSuccess and StripePaymentCancel.
StripePaymentSuccess
const StripePaymentSuccess = () => {
  return (
    <>
      <h2>Thanks for your order!</h2>
      <h4>Your payment is successful.</h4>
      <p>
        We appreciate your business! If you have any questions, please email
        <a href="mailto:orders@example.com">orders@example.com</a>.
      </p>
      <div>
        <button> Go to Order page</button>
      </div>
    </>
  );
};

export default StripePaymentSuccess;
StripePaymentCancel
const StripePaymentCancel = () => {
  return (
    <>
      <h4>Oops! Your payment has been cancelled.</h4>
      <p>
        We appreciate your business! If you have any questions, please email
        <a href="mailto:orders@example.com">orders@example.com</a>.
      </p>
      <div>
        <button> Go to Home page</button>
      </div>
    </>
  );
};

export default StripePaymentCancel;

Step 10:
💻 It’s time to run react application and Node js server.
To Run React application
npm run start
To Run Node JS server
node index.js
Once your react app starts, run your stripe checkout component.
If you want to learn how to set up Routing in React, please see the below article.
React Build Routing with Fixed Header and Navigation | React Router Tutorial

✔ Once you click on the Pay button you will be redirected to the Stripe Payment page.
Note: We have to set up Account Name in Stripe Account to proceed successfully on Stripe Payment Page. In case the account name does not set, the below error will come on the server-side.
Go to Account Page: https://dashboard.stripe.com/account
(node:14032) UnhandledPromiseRejectionWarning: Error: In order to use Checkout, you must set an account or business name at https://dashboard.stripe.com/account.
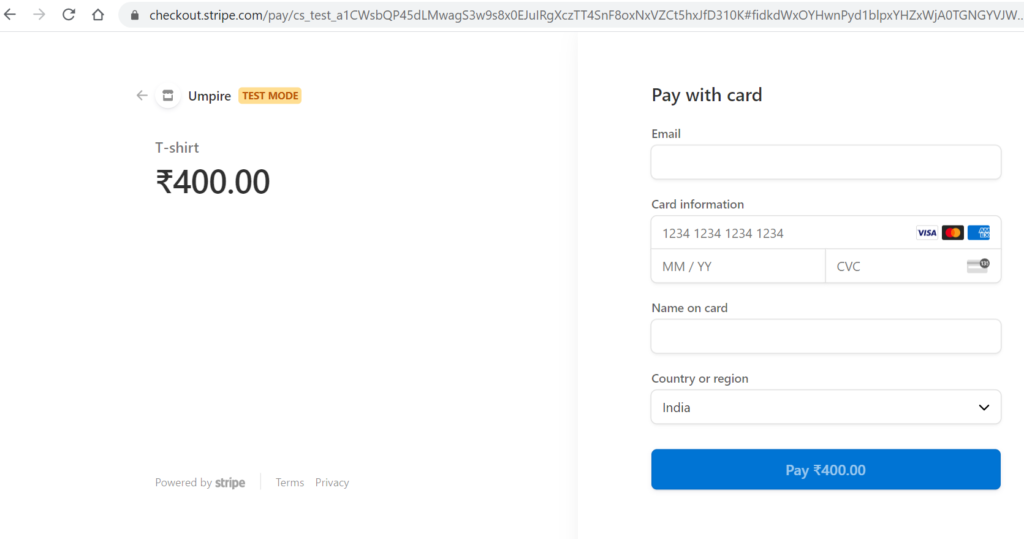
✔ Now it's time to test our Payment Gateway.
To Test payment, we will use Test Card Data which is provided by Stripe.
You can read here: https://stripe.com/docs/testing
💡 You can use the below values to test payment.
| NUMBER | BRAND | CVC | DATE |
|---|---|---|---|
| 4242424242424242 | Visa | Any 3 digits | Any future date |
| 4000056655665556 | Visa (debit) | Any 3 digits | Any future date |
Read Document for Payments and APIS:
https://stripe.com/docs/payments/accept-a-payment
✋ If your payment request becomes successful, you will be redirected to the success page.
▶ And Its done !!!!!!!!!!!!!!!!!!!!!!!
**********
React JS Stripe Payment